Well what a surprise. So what to do?
Having a lie in was number one priority, followed by a list of chores, but after that the aim is to cut the wood for the baseboards of Llanrhaiadr Mochnant, and a smaller board to use for test building my first ply and rivet EM gauge track in thirty two years.
And just for a change I might rebuild the track bed of the garden railway, which hasn't seen a single train run this year.
Meanwhile I have a couple of conundrums to consider.
The first is the bridge.
Now as far as I can ascertain I got the dimensions absolutely right, but it doesn't look it, does it? Now some of this is down to taking photos of a small layout with inappropriate cameras, which is very tempting because a wide angle lens has lots of benefits when trying to take photos inside a very small box. You'll have noticed that in some photos of the station it looks like I've forgotten what a right angle is, but trust me that is mostly down to barrel distortion of the lens used. Mostly. On the other hand this is a very small bridge which wasn't designed for large locos. Bearing in mind that LM didn't feature a bridge in reality, but one is needed as a scenic break, should I be prepared to go down the "based on" route rather than being strictly prototypical?
The second issue is about lineside fencing.I know I need some, and it should be post and wire fencing, but again what compromises should I make, especially where the "wire" is concerned? In the past I've used wire, I've used plastic rod and I've used nylon , but all of them seem to be not quite right somehow. Any ideas?
Moving from an OO gauge micro-layout to an EM gauge compromise, via a rather major diversion into both 7 1/4" gauge and minimal space OO9
Labels
Layout Design
Blodwell
Buildings
The Art of Compromise
Photography
Llanrhaiadr Mochnant
Scenery
Signal Box
Baseboards
Goods Yard
Track
45XX
Apa Box
EM
Lcut Creative
Travel
Backscene
Concepts
Railway Exhibitions
TVR
USA
Upwold
14XX
Anyrail
Bridge
Cuba
Cycling
Fencing
Lorry
Narrow Gauge
Point rodding
Points
Templot
Turnouts
West Maryland
Books
C+L
Fiddleyard
GWR
Hales
OO9
Phil Parker
Rolling Stock
Signals
State of the hobby
Tillig
Warley
Weighbridge
trams
2012
AC Railbus
Albion Yard
Allt-y-Graban Rd
Apa Valley
Balloch Pier
Bas
Bath Green Park
Brickwork
Bridgnorth
Bryn-y-Felin
CSX
Charmouth
Clarendon
Class 25
Cliff Railway
Coldrennick Road
Corris
Crich
DCC
Disused Railways
Dukedog
EMGS
Edwin Smith
Electrics
Emett
France
Gloucestershire & Warwickshire
HO
Hobbies
Hope under Dinmore
Hospital Gates
Iain Rice
Iliffe Stokes
Inspiration
Ireland
Kings Lynn
La Baraque
Lasercut
Leamington & Warwick
Locos
MSTS
Mainly Trains
Military Modeling
Mishaps
N guage
NEC
OOn3
Percy
Pier Railway
Porth y Waen
Preserved Railways
RTR
SMP
Seend
Sentinel
Sketchup
St Minions
Stockholm
TGV
TRAX
Tansey Bank
Techniques
Technology
Tim Horn
Trade
Trees
Ultrascale
Veldhoveh 1935
Watertank
Williamsport
diorama
manning wardle
painting
procrastination
pug
ships
simulators
Showing posts with label Bridge. Show all posts
Saturday, 24 August 2013
Saturday, 17 August 2013
The Bridge
I really need to darken both the brickwork and the stone. I've also decided I couldn't live with the crude windows in the weighbridge hut. So my question is how do you best remove Glue N Glaze? It seems to be resisting all my efforts to clean the last bits away from around the edges.
Sunday, 26 May 2013
What a difference a day makes
I had been hoping to get to Railex this year, not having been able to go last year.
Unfortunately during the week someone stole my wallet with all my credit cards and the cash I'd earmarked for spending at the show, so that idea went out the window.
The good news is it meant I had a day at home on a Saturday when the wife was working and I wasn't, and that I decided to prioritse work on the layout.
I had a list of things I wanted to get done by the end of the day. Now anyone looking back through this blog will realise that I'm notoriously bad at keeping to my self imposed deadlines but for once I didn't do too badly.
It helped that on the Friday before work I finally fixed the point operating mechanism with a replacement DPDT switch - you don't need a DPDT for the electrics but generally they are larger than SPDT switches so provide sufficient mechanical throw to operate the point blades. A couple of quick remedial dabs with the soldering iron and I was back with a fully operational layout, meaning Staurday could be devoted to scenics.
I'd also used Friday evening to make a start on the replacement for the road bridge. The original version was built from card and scenic papers. I quite liked it but a decision to go for 3d corrugated textures on the goods shed and platform shed made me worry that the 2d look would be too obvious, so I swapped over to using Wills sheets. If anything these have more 3d texture than I would like.
Anyway by the end of Saturday the components of the new version were complete and painted, and I just need to assemble them. I'm not 100% happy with the colouring of either the stone or the brickwork but I think that just needs a bot of tinkering to sort out. Overall I think it is an imporvement.
The next thing you might note is that finally there is some ground cover in place. Shaping the polystyrene block to form the landscape was a bit messy since having dug out my hotwire cutter I couldn't find the resistance wire and had to resort to using a fretsaw. next time I'm going to use foamboard formers instead so that I have a little more control. The ground cover itself is hanging basket liner teased with a dog metal grooming brush. The great thing about this material is that it is thick enough to use to give more structure to the landscaping and also that joins are easily disguised. It needs mowing with scissors and then it form the base for further scenic treatments.
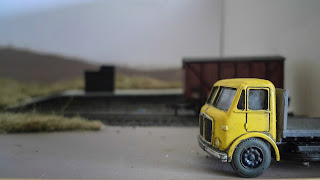
On my wishlist for purchase at RAILEX was a replacement body for my Base Toys lorry. Since I couldn't go I bit the bullet and very quickly fabricated a flatbed for it. In the background you'll see a platform is in place, and on it is a little balck shed....
This is the shed/urinal that was found, in some form or another, at the end of most platforms on the Tanat Valley. I'm afraid I miscalculated a few things when assembling this one so it is destined for the scrap bin, but building it was a useful exercise. This is the building which forced my hand to move to 3d sheets rather than printed paper because although there are some excellent corrugated iron textures available they wouldn't work for the free standing walls of the gents.
Finally here is an aerial shot showing the current stat of play. From my perspective the great thing is that from now on everything that needs to be done is easily broken down into jobs that can be fitted into a couple of hours here and there. I need to finish off the ballasting after I put in the point rodding, rebuild the gents, finish the signal box and build the goods shed and put down textures for the platform and the goods yard. Incidentally since the layout is set after the end of passenger services the platform is going to be modelled in an overgrown state. The black shape is a weighbridge. i'm still undecide about whether or not to go ahead with that idea because the shed would obscure the view of the signal box from "the ideal viewing position" Then the backscene needs to be finished. A grab shot lat last night included some odd shadows that have made me wonder about putting a suggestion hills onto the backscene rather than sky.
Unfortunately during the week someone stole my wallet with all my credit cards and the cash I'd earmarked for spending at the show, so that idea went out the window.
The good news is it meant I had a day at home on a Saturday when the wife was working and I wasn't, and that I decided to prioritse work on the layout.
I had a list of things I wanted to get done by the end of the day. Now anyone looking back through this blog will realise that I'm notoriously bad at keeping to my self imposed deadlines but for once I didn't do too badly.
It helped that on the Friday before work I finally fixed the point operating mechanism with a replacement DPDT switch - you don't need a DPDT for the electrics but generally they are larger than SPDT switches so provide sufficient mechanical throw to operate the point blades. A couple of quick remedial dabs with the soldering iron and I was back with a fully operational layout, meaning Staurday could be devoted to scenics.
I'd also used Friday evening to make a start on the replacement for the road bridge. The original version was built from card and scenic papers. I quite liked it but a decision to go for 3d corrugated textures on the goods shed and platform shed made me worry that the 2d look would be too obvious, so I swapped over to using Wills sheets. If anything these have more 3d texture than I would like.
Anyway by the end of Saturday the components of the new version were complete and painted, and I just need to assemble them. I'm not 100% happy with the colouring of either the stone or the brickwork but I think that just needs a bot of tinkering to sort out. Overall I think it is an imporvement.
![]() |
| Note that the various components of the bridge are yet to be joined and are just leaning against each other |
![]() |
| The Base Toys lorry converted to a flat bed |
![]() |
| The usual facilities |
This is the shed/urinal that was found, in some form or another, at the end of most platforms on the Tanat Valley. I'm afraid I miscalculated a few things when assembling this one so it is destined for the scrap bin, but building it was a useful exercise. This is the building which forced my hand to move to 3d sheets rather than printed paper because although there are some excellent corrugated iron textures available they wouldn't work for the free standing walls of the gents.
![]() |
| Minimum space modelling |
![]() |
| Moody |
Subscribe to:
Posts (Atom)


