Fitting a collar onto the wire connecting the switch to the tiebar seems to have worked as well so I should be able to install that permanently one day this week. So if all goes to plan Saturday will be spent ballasting the track and Sunday will be spent
Tuesday, 11 December 2012
What happened next....
... was I worked out that the Scotchlok connectors used to connect the drop wires to the bus hadn't worked. As it happens this doesn't have a material impact at the moment because for once my track-laying has been good enough to ensure electricity is flowing to all the right places. However I doubt that will remain the case over time. So I think I'm going to raid the tool box for some low tech chocblok connectors.
Fitting a collar onto the wire connecting the switch to the tiebar seems to have worked as well so I should be able to install that permanently one day this week. So if all goes to plan Saturday will be spent ballasting the track and Sunday will be spentremoving all the ballast and starting again building the over bridge. I can't describe how much I'm looking forward to moving on to the scenic work.
Fitting a collar onto the wire connecting the switch to the tiebar seems to have worked as well so I should be able to install that permanently one day this week. So if all goes to plan Saturday will be spent ballasting the track and Sunday will be spent
Sunday, 2 December 2012
Progress of a Sort
So today I decided I really should get some progress made before getting buried in Xmas preparations and a couple of new work assignments that will probably take me out of the country once again.
I had to buy a new soldering iron a few months ago, but in the end never got to take it out of its packet. SO when I did today to start work on the layout I was taken aback to discover just how short a power cable it came with. Fine if you have a desktop socket on a workbench, but not for me. I could have used an extension lead you are thinking, but that would be to forget that it is Xmas and every extension lead in the house has been re-purposed for the festivities.
To some extent I could compensate because the baseboard is so light it is relatively easy to take it to the tool rather than the other way around, but it made everything very awkward, that's my excuse for what follows...
My plan had been to use Tillig's own power clips to attach to the rails, and then solder drop wires through the baseboard from those. I thought this would be less obtrusive than soldering wires direct to the rail with the power clips being relatively easy to hide under ballast.
Unfortunately whatever the trick is to attaching these clips I haven't worked it out yet and having bent several out of shape without them coming any closer to gripping the rail I moved on to plan B and soldering the droppers directly.

Had I thought things through in advance I would have made provision to do this at an earlier stage by cutting away more of the sleeper webs and removing the chemical blackening that the rail has. Trying to do this with the rail and sleepers already assembled wasn't that easy. It probably would have been if I had put everything down and started again tomorrow evening. It usually is. It would also probably been easier if at this point I'd changed the wire I was using, but having already cut some to length I ploughed on. Big mistake.
The net result was I've ended up with some problematic connections, including one dropper that seems determined not to be soldered at all. Unfortunately repeated efforts have probably made the situation worse, so tomorrow some radical cleaning up will be called for before I start again.
The good news I guess is that the track is actually laid now, and mostly connected to the DCC bus. For such a simple track plan I've probably made things a lot more difficult for myself than I needed
Oh then there is the question of the point mechanism. The use of the DPDT is proving problematical. I suspect there is just a little too much springiness in the wire I've got connecting it to the tie bar, but the tie bar also seems to be lifting rather than sliding. I need a think. I can probably put a collar round the wire to alleviate the springiness.
Wednesday, 28 November 2012
Motivation
So after Warley I should be really motivated and making progress, especially since I've been so critical of others.
As usual though life intervenes, or rather work does., with a to do list that has suddenly started to grow again at an alarming rate. The great thing about building a small layout though is that it sits on my desk as I work, so if nothing else I can keep scheming.
I'm still worried about the catch point , or rather the lack of one. Tillig do an extendable piece of track designed to bridge baseboard joins that features overlapping tapered rails - a photo here is much better than my attempt at a description. I'm wondering whether I could butcher one into a cosmetic representation of a trap point.
On a more concrete level I've been experimenting with ballasting techniques. I've discovered that QuickShine FloorFinish, avialble in the UK from Lakeland is a practical alternative to Johnson's Klear, so it looks like that little problem is solved.

As usual though life intervenes, or rather work does., with a to do list that has suddenly started to grow again at an alarming rate. The great thing about building a small layout though is that it sits on my desk as I work, so if nothing else I can keep scheming.
I'm still worried about the catch point , or rather the lack of one. Tillig do an extendable piece of track designed to bridge baseboard joins that features overlapping tapered rails - a photo here is much better than my attempt at a description. I'm wondering whether I could butcher one into a cosmetic representation of a trap point.
 |
| Perhaps not... |
On a more concrete level I've been experimenting with ballasting techniques. I've discovered that QuickShine FloorFinish, avialble in the UK from Lakeland is a practical alternative to Johnson's Klear, so it looks like that little problem is solved.

Monday, 26 November 2012
Traders and Demos
In yesterday's post about the Warley show I focused on the layouts. Of course they are just one part of the show. A considerable amount of floorspace, and the attention of the visitors, is devoted to the traders, and perhaps to a lesser extent, on the demo stands.
Not for the first time at Warley I went with a small stash of spending money and a long list of things to spend it on, and came away having spent nothing but the price of a pork bap.
One great advantage of the NEC compared to some venues is that at least there are cash dispensers available, and judging by the queues for them other people were spending money even if I wasn't.
The layout of the hall is zoned, so a lot of the big name traders were clustered around the entrance and the first couple of aisles. Unfortunately this added to the sensation of over-crowding, especially when sharing space with those whose enthusiasm for their own interests over-powered any awareness of others. I saw several children knocked over, narrowly avoided a few carelessly swung rucksacks myself, and felt for the disabled visitors. Perhaps the 16mm AGM where access for the less able and an emphasis on space has spoiled me. Actually it isn't as though the space wasn't available at Warley but some of it wasn't well used. One thing they do get right is the provision of a lot of seating space and food outlets. Then I'm a sucker for a pork bap.
I did get a chance to look at some of the delights on the Kernow stand. Unfortunately my lack of note taking means I'm not sure if it was there or on the Howes stand that I saw the prototypes of the Heljan AC railcar which is definitely on my list for purchase in the new year.
I've had my eye on the Hold and Fold from Eileen's Emporium for some time but decided I can't currently justify the cost. I'll be reporting back soon on an alternative at roughly half the price. I suspect the difference in quality will show, but my needs are relatively simple at the moment.
I wish I'd taken the time to speak to more of the DCC specific traders, especially DCC Concepts and Train Tech. The former because their web site is so badly designed, the latter because I need to convince myself their one touch point control system will work. The trouble is I'm at that stage of being so new to DCC that I don't know what questions to ask, and a busy exhibition stand doesn't seem the best place to start.
A lot of the manufacturers and traders I was most interested in were at the far end of the hall in the MRJ Small Suppliers section. This was good in that the stands weren't busy with the general public, but bad in that by the time you got to it exhaustion was setting in. Whilst I didn't buy anything - I nearly succumbed to the Deans Siding Neath & Brecon tank to use up one of my spare 0-6-0 chassis -it was useful to see things in the flesh. I think I had the typical male response of being overwhelmed by choice. Next year I think I'm going to do the show in reverse order and start here.
The two stands demonstrating Rail Simulator are worth a positive mention too. They seemed to really engaging with the audience and also showed how the graphics have improved with the current incarnation. Unfortunately my current PC doesn't have the spec to do it justice.

Finally a mention for the demo stands. Again putting these towards the end had the advantage that they were less crowded, and the disadvantage that time was limited when I got there. I'm notoriously bad at planning visits to demos at exhibitions and next year I'll aim to have a more targeted approach.
On reflection I can't help thinking that my personal experience of a show like this is inseparable from where I am on this project. Normally I would have spent most of my time looking at the narrow gauge layouts and the big show piece layout and the traders selling the more idiosyncratic products. It felt quite weird being attracted to GWR branchlines and those traders selling the bits and pieces needed to build an atmosphere of total mundaness.
Sunday, 25 November 2012
Warley 2012
The Warely model railway show at the NEC has become something of an institution. The Warley club who organise it have always built excellent layouts themselves, and from the days when I was a lad in Birmingham and the show was held in the Harry Mitchell Recreation Centre it has attracted some stunning and memorable layouts.
I don't go every year, not least because I do find my fellow enthusiasts a rather unappealing crowd with their body odour, beer bellies, rucksacks, lack of social awareness and dubious fashion sense. Sorry, but that is how it is. In recent years I've also found the standard of the layouts more variable. I suspect in part though this is because the general standard of modelling has improved so much, and the model railway press do such an excellent job of showing layouts in their best possible light that itmakes it hard for them to live up to expectations.
I point this out because when captioning photos on my Flickr photostream for the show I couldn't help feeling I was being very negative. On reflection I think it was because I was subjecting the layouts to the sort of scrutiny I'm giving to my own efforts and also it makes a difference viewing a layout through the lens of a camera - you become very aware of those things that destroy the illusion of reality. Incidentally if the crowds round some of the layouts were anything to go by my view of some of the layouts wasn't shared by the majority.
So what follows is a very personal view, and isn't intended to be derogatory in any way.
Lets Do The Time Warp Again
Having mentioned how much modelling has improved in the last thirty years it is disappointing to see elements that wouldn't have looked out of place on the typical Railway of the Month from the 1960s. Topping that list has to be trees made from lichen, poor back-scenes and obvious straight line baseboard joins.
Sadly the one layout I really went to the show to see, Hospital Gates, suffered badly from both the baseboard joint issue and a back-scene that didn't integrate well with the modelled portion of the layout.

It was a real pity, because clearly a lot of thought had gone into the backscene, and it had been painted with considerable skill and thought. Overall this is a great layout but one that struggles to live up to published photographs of it.
Incidentally Bath Green Park was another layout which I felt had a mismatched style of backscene despite trying to recreate a realistic sky line.I found it quite distracting on an otherwise stunning layout,
Photos v. the Real World v. Exhibition Halls
It really is a lot easier to build a layout to be convincing to the camera in individual shots than to be convincing to the human eye taking in the whole layout from an unlimited number of angles. Two of the best continental layouts on display, the well known Veldhoveh 1935 and the new to me La Baraque addressed this by careful presentation and control of the eyeline to ensure cameos attracted the attention rather than the whole layout.
Both these layouts take a novel approach, Veldhoveh's is very theatrical and involves forced perspective with buildings (and trams) in dufferent scales
La Baraque is designed to be viewed in the round, and this seemed very popular. It does lead to a few odd visual problems where the backscene doesn't extend across the whole of your line of vision.
The conclusion I walked away with is that proper framing is vitally important, and too many layouts don't take it into account. Again I could be being a little unfair because framing might be more evident in the rooms they normally live in where they are observed from a more restricted space.. There is no doubt that a large exhibition hall like the NEC distorts things spatially. 4mm and even 7mm stock seems to shrink which means you don't get a feel for just how big some of the layouts on display are.
Another challenge of the exhibition hall is lighting. It is one of the reasons most of my photos from the show have been subjected to more post processing than I normally indulge in. You get a real mix of lighting sources that can distort colour not only in photos but to the eye as well. Most layouts at the show recognised the importance of lighting but in counteracting the hall lighting the effect achieved was more often than not that of a Summer's day in India rather than a typical British day. The only days I saw any sunshine this year were on my trips to India.
Because my photo blog is currently based around using a compact camera for a year I used the trusty D-Lux for all these shots. The DSLR with a decent prime would have been my camera of choice. As always photographers were out in force, and as always I found myself wondering about the type of photos people were taking and what they were intending to do with them.
Cars and Boats and Planes
The standard of boats on most layouts has improved enormously over the years, and you had to be impressed by Maid of the Loch on Balloch Pier
Along with the improvement with the boats has come some staggeringly good modelling of water in different states, like this scene on Coldrennick Road.
When it comes to road transport though there is something I don't understand. The basic quality of cars and lorries available to the 4mm scale modeller in particular is everything you could ask for, yet on layout after layout they stick out like a sore thumb. Why? Sometimes it is because the model has become a bit of a cliche, sometimes it is the finish, often even attempts to improve realism seem to have the opposite effect - especially anything involving chrome - and perhaps above anything else there is something about how they are placed on the layout. This I think can probably be divided into two elements: How they are posed to look natural, which to me means looking like they've been parked by a human driver, and secondly how they "sit" on the layout.
At the moment this is putting me off any plans to put a lorry on my layout, even though several photos I have of the Tanat Valley in the period feature them.
As for planes...well just don't, they never work.
Operation
It wasn't until I got home that it struck me that I'd hardly bothered to watch any of the layouts actually operating. I suspect that this is because operation isn't going to be a major feature of Apa, and the layouts that most caught me eye worked just as well, if not better, without a train in sight, like Bryn-y-Felin
For me perhaps another element is at play, that I can best sum up as "involvement" A couple of layouts were finely observed and exquisitely modelled but didn't grab me in any way emotionally. Hope Under Dinmore is a good example.

And the Winner is...
I want to stress again that I've emphasised the negatives because they are things I want to avoid myself, and that I'm aware my tastes might not be mainstream. I'm sure many would have gone for Liverpool Lime St, Bath Green Park or Hospital Gates. I've already said how good I thought Veldhoveh and La Baraque were.
If you go by the number of photos I took then the old charmer that is Charmouth was a clear winner.

When I go by the time I spent just looking at a layout though, then the winner is the one that made me think "Yes, that's what I'm trying to achieve" and on that criteria the prize goes to Allt-y-Graban Rd. This might be bad news because on that basis I might have to widen my gauge a little.
I don't go every year, not least because I do find my fellow enthusiasts a rather unappealing crowd with their body odour, beer bellies, rucksacks, lack of social awareness and dubious fashion sense. Sorry, but that is how it is. In recent years I've also found the standard of the layouts more variable. I suspect in part though this is because the general standard of modelling has improved so much, and the model railway press do such an excellent job of showing layouts in their best possible light that itmakes it hard for them to live up to expectations.
I point this out because when captioning photos on my Flickr photostream for the show I couldn't help feeling I was being very negative. On reflection I think it was because I was subjecting the layouts to the sort of scrutiny I'm giving to my own efforts and also it makes a difference viewing a layout through the lens of a camera - you become very aware of those things that destroy the illusion of reality. Incidentally if the crowds round some of the layouts were anything to go by my view of some of the layouts wasn't shared by the majority.
So what follows is a very personal view, and isn't intended to be derogatory in any way.
Lets Do The Time Warp Again
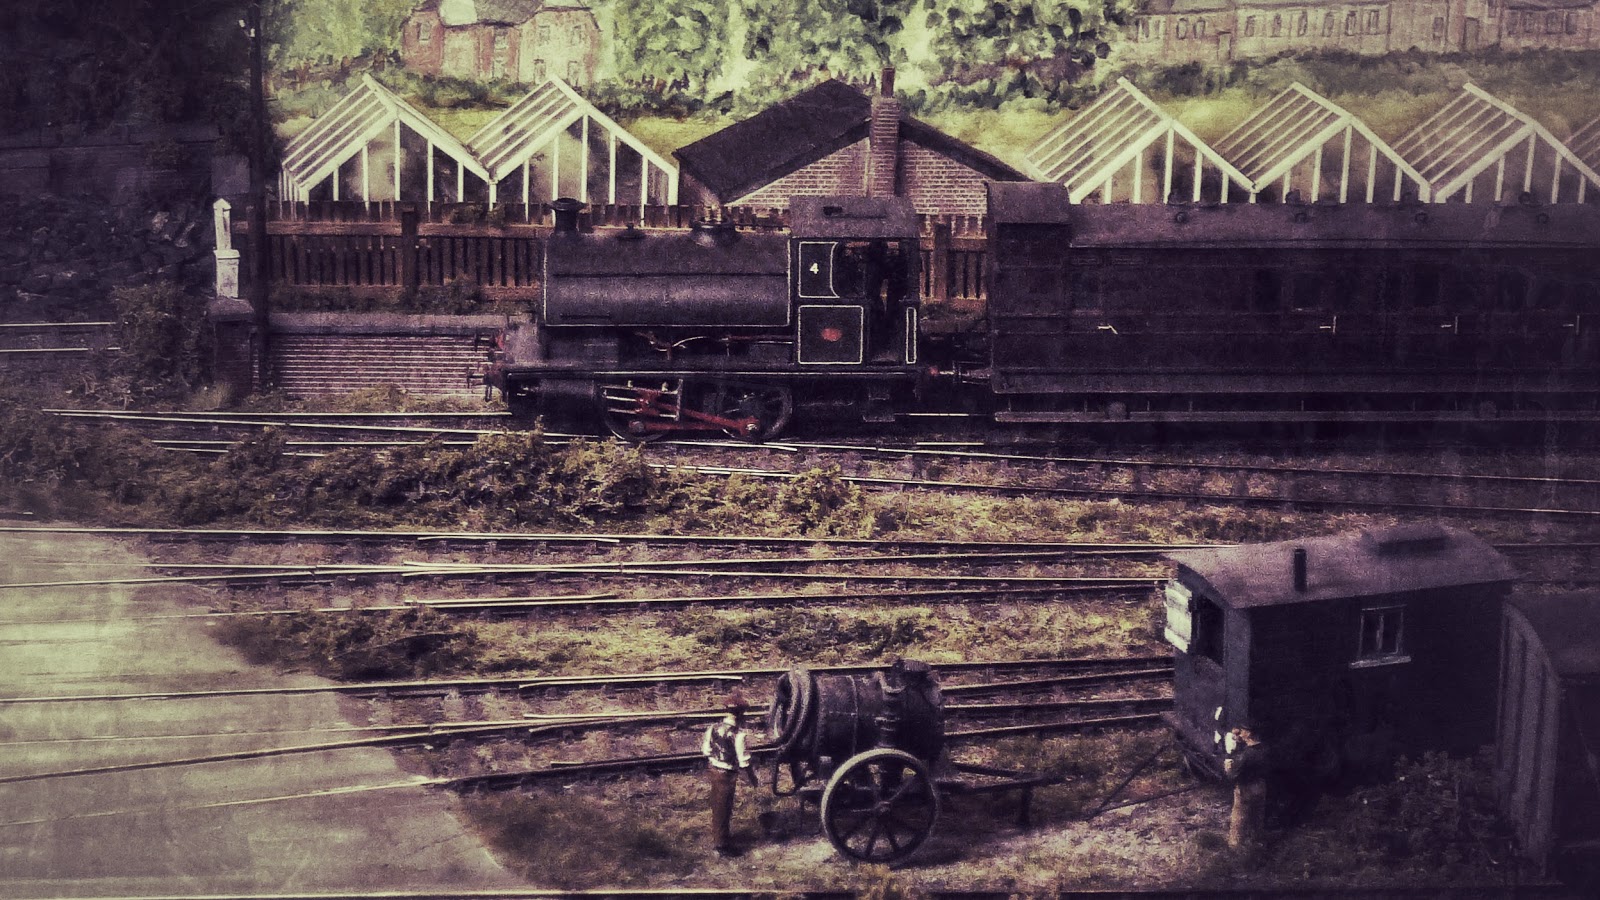
Having mentioned how much modelling has improved in the last thirty years it is disappointing to see elements that wouldn't have looked out of place on the typical Railway of the Month from the 1960s. Topping that list has to be trees made from lichen, poor back-scenes and obvious straight line baseboard joins.
 |
| Nice wagons, shame about the trees |
Sadly the one layout I really went to the show to see, Hospital Gates, suffered badly from both the baseboard joint issue and a back-scene that didn't integrate well with the modelled portion of the layout.
It was a real pity, because clearly a lot of thought had gone into the backscene, and it had been painted with considerable skill and thought. Overall this is a great layout but one that struggles to live up to published photographs of it.
Incidentally Bath Green Park was another layout which I felt had a mismatched style of backscene despite trying to recreate a realistic sky line.I found it quite distracting on an otherwise stunning layout,
Photos v. the Real World v. Exhibition Halls
It really is a lot easier to build a layout to be convincing to the camera in individual shots than to be convincing to the human eye taking in the whole layout from an unlimited number of angles. Two of the best continental layouts on display, the well known Veldhoveh 1935 and the new to me La Baraque addressed this by careful presentation and control of the eyeline to ensure cameos attracted the attention rather than the whole layout.
 |
| Veldhoveh - almost like being there |
 |
| La Baraque had a touch of the Madder Valley about it |
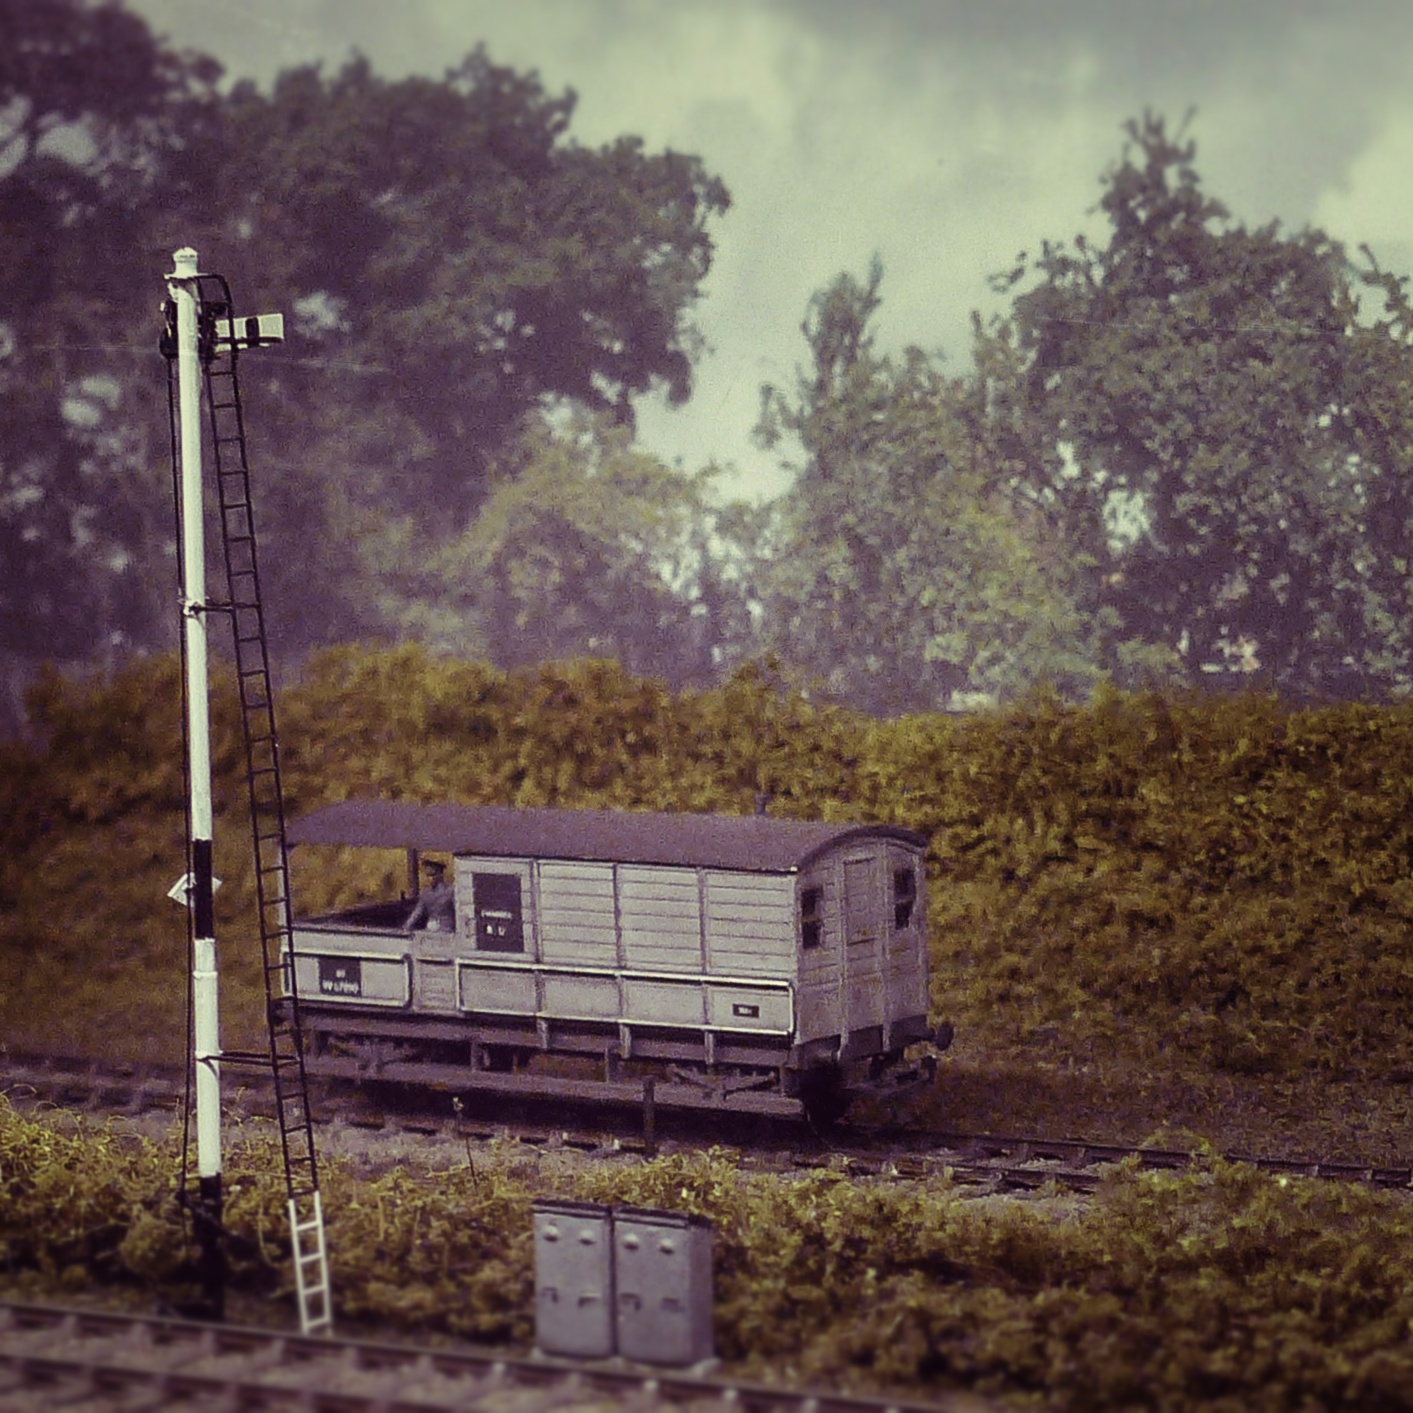
Both these layouts take a novel approach, Veldhoveh's is very theatrical and involves forced perspective with buildings (and trams) in dufferent scales
 |
| That is what a model railway backscene should look like |
La Baraque is designed to be viewed in the round, and this seemed very popular. It does lead to a few odd visual problems where the backscene doesn't extend across the whole of your line of vision.
The conclusion I walked away with is that proper framing is vitally important, and too many layouts don't take it into account. Again I could be being a little unfair because framing might be more evident in the rooms they normally live in where they are observed from a more restricted space.. There is no doubt that a large exhibition hall like the NEC distorts things spatially. 4mm and even 7mm stock seems to shrink which means you don't get a feel for just how big some of the layouts on display are.
Another challenge of the exhibition hall is lighting. It is one of the reasons most of my photos from the show have been subjected to more post processing than I normally indulge in. You get a real mix of lighting sources that can distort colour not only in photos but to the eye as well. Most layouts at the show recognised the importance of lighting but in counteracting the hall lighting the effect achieved was more often than not that of a Summer's day in India rather than a typical British day. The only days I saw any sunshine this year were on my trips to India.
Because my photo blog is currently based around using a compact camera for a year I used the trusty D-Lux for all these shots. The DSLR with a decent prime would have been my camera of choice. As always photographers were out in force, and as always I found myself wondering about the type of photos people were taking and what they were intending to do with them.
Cars and Boats and Planes
The standard of boats on most layouts has improved enormously over the years, and you had to be impressed by Maid of the Loch on Balloch Pier
 |
| The choice was cut off the mast or show another prematurely truncated back scene |
Along with the improvement with the boats has come some staggeringly good modelling of water in different states, like this scene on Coldrennick Road.
 |
| The illusion of depth here was ruined as soon as a train was in the frame |
When it comes to road transport though there is something I don't understand. The basic quality of cars and lorries available to the 4mm scale modeller in particular is everything you could ask for, yet on layout after layout they stick out like a sore thumb. Why? Sometimes it is because the model has become a bit of a cliche, sometimes it is the finish, often even attempts to improve realism seem to have the opposite effect - especially anything involving chrome - and perhaps above anything else there is something about how they are placed on the layout. This I think can probably be divided into two elements: How they are posed to look natural, which to me means looking like they've been parked by a human driver, and secondly how they "sit" on the layout.
At the moment this is putting me off any plans to put a lorry on my layout, even though several photos I have of the Tanat Valley in the period feature them.
As for planes...well just don't, they never work.
Operation
It wasn't until I got home that it struck me that I'd hardly bothered to watch any of the layouts actually operating. I suspect that this is because operation isn't going to be a major feature of Apa, and the layouts that most caught me eye worked just as well, if not better, without a train in sight, like Bryn-y-Felin
 |
| Just add rain |
For me perhaps another element is at play, that I can best sum up as "involvement" A couple of layouts were finely observed and exquisitely modelled but didn't grab me in any way emotionally. Hope Under Dinmore is a good example.

And the Winner is...
I want to stress again that I've emphasised the negatives because they are things I want to avoid myself, and that I'm aware my tastes might not be mainstream. I'm sure many would have gone for Liverpool Lime St, Bath Green Park or Hospital Gates. I've already said how good I thought Veldhoveh and La Baraque were.
If you go by the number of photos I took then the old charmer that is Charmouth was a clear winner.

When I go by the time I spent just looking at a layout though, then the winner is the one that made me think "Yes, that's what I'm trying to achieve" and on that criteria the prize goes to Allt-y-Graban Rd. This might be bad news because on that basis I might have to widen my gauge a little.
 |
| Allt-y-Graban Road. Picture perfect |
Sunday, 18 November 2012
Parkers Guide
I've just realised that one of the missing links on this site is the one to Phil Parker's Workbench. Phil's quite well know through his contributions to Hornby Magazine but I first came across him because his Hellingly Hospital layout kept coming up in searches I did for various things.
Phil somehow manages to produce a blog post every day, and it is invariably worth reading even if the topics sometimes range outside my main areas of interest.
Anyway Phil has recently published a special Parkers Guide bringing together some of the projects from the magazine with some new ones, and jolly good it is too.
Sunday, 11 November 2012
Fear Factor
Time for an update on the layout itself.
By now I'd planned to have the track laid. Three things have delayed it. The first was trying to work out the best way to hack out the ends of the Apa box to allow for connection to the fiddleyards. This would obviously have been a lot easier if I'd done it before constructing the box and if my jigsaw hadn't given up the ghost. In the end it came down to drilling the corners and some violence with a Stanley knife.
Then there was the embarrasment of losing the rail joiners. These eventually turned up after a week of looking taped to a box for safe-keeping - but not before I'd ordered replacements.
The real reason for the delay is the fear factor. I have horrible memories of my childhood n gauge layout never recovering from my attempt to ballast it and I've got the added complication on trying to fit in an operating mechanism for the point.
I really can't justify the cost of the DCC peripherals for a single turnout so I've gone for a mechanical option that should also allow me to switch the supply to the frog.

A DPDT switch, because I happened to have one, though a SPDT would do the job, drilled to take an operating rod of unknown origin and a length of .45 wire to engage with the tie bar. This is the first time I've tried this idea and I can't believe it is actually going to work.
So, no more excuses, the next big job will be to get the track down and wired.
Saturday, 10 November 2012
I had a cunning plan
Wanting to use this project as a first step into the world of DCC I scouted around for the most economical and foolproof way of going about it
My cunning plan was to use one of the digital trainsets on the market, knowing that I wouldn't use half the content of the box, but possibly recovering some cash via ebay.The advantage of this in theory was I would get a DCC set up, including two locos, that I knew would work.
So I went ahead and pre-ordered the Hornby Mixed Freight Set for considerably less than the current price.
Now I have a sneaky suspicion that when I ordered it the box art featured a Jinty and the 08 from the main range. I noticed soon afterwards that the steam engine had changed into the J83, which has always struck me as an odd choice of prototype. On the other hand it does bear a passing resemblance to my much missed Triang Nellie so it isn't all bad. Actually since the Hornby model is such a poor approximation of the J83 in the first place I might just paint it blue and annoy the purists.
The real disappointment, and I should have guessed this, is that the 08 is the inside framed "Railroad" version.
Oops.
Well at least I've got two chipped locos that run, and I suspectg run better than the non DCC version of the basic Hornby 0-6-0. Once upon a time the solution would have been easy becasue it seemed that every whitemetal kit on the market was designed to fit the Triang 0-6-0 chassis. Things have moved on though. Well if nothing else I have a couple of donors to try out some loco-bashing techniques on.
Then there are the wagons.

Well again they are as absic as you can get these days. Actually for the toy market they aren't a bad compromise. Those tension lock couplers come as a bit of a shock having got used to the Bachmann NEM pocket variety but will soon come off., as will the lugs attaching the body to the chassis. I'm stuck with the solid brake lever.
Nicely printed body though. A pity Apa is set in the period when PO wagons were already a thing of the past. So some heavy weathering is underway to represent an ex-PO wagon that has had a quick coat of unfitted gray paint many years ago and is now fading back to a mixture of bare wood and the original livery. You know it is already looking a lot better.

Friday, 2 November 2012
Oh Dear
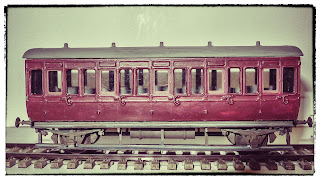
If you thought the plain side of the coach was bad wait until you see my attempt at painting the paneling.

I'm consoling myself that in poor light from the other side of the room it looks OKish.
The reality is that is has taught me a lot of lessons in a relatively short time and with little cost. I'm sure if I was to build another one today it would be substantially better. In any case it is a good reminder that this project us about (re) learning techniques and if Mk1 ends up in the bin in the New Year it will be because I'm confident I can build a better Mk 2.
Thursday, 1 November 2012
That Darned Coach
What should have been a very quick and simple project for an evening has ended up taking three and still isn't finished. It could have been if I hadn't messed around with paint schemes a couple of times though. The paint really doesn't bear close scrutiny. Having said that it has been a useful little job that has helped me start to get my eye and hand back in.
The roof and glazing aren't fixed yet, and I've got quite a bit of painting still to do. I'm hopeful that weathering will help as well.
If nothing else it proves how useful photography can be for those of us modelers with poor eyesight. I find it a lot easy to pick up on the flaws that need correcting when I'm working forma photo that is bigger than life size.
Tuesday, 30 October 2012
Apa Valley Mark 2
I did some work today on both the overbridge and Porth-y Waen ground frame. I'm at the stage of building throwaway test pieces to check that I'm on the right lines. Helping this approach is the use of building papers from two sources, Scalescenes and Clever Models which once purchased can be printed off endlessly, so mistakes are cheap.
Whether I stick with card going forward is another question for the future. As far as this incarnation is concerned I think I will, but I'm already considering options for the Mk 2 version. I've already got a wish list of features I want to include as part of the learning process that I think would be over ambitious to include in this version if I want to get it basically complete by the end of the year.
The biggest of these must be the shift to EM. To get some idea of the visual impact of this I downloaded Templot
 And here you see a comparison of the Tilig track compared to an EM turnout plotted by Templot. Depressing, isn't it?
Whether I stick with card going forward is another question for the future. As far as this incarnation is concerned I think I will, but I'm already considering options for the Mk 2 version. I've already got a wish list of features I want to include as part of the learning process that I think would be over ambitious to include in this version if I want to get it basically complete by the end of the year.
The biggest of these must be the shift to EM. To get some idea of the visual impact of this I downloaded Templot

Monday, 29 October 2012
Decisons
So after yesterday's problems what to do today?
Well I'm going to live with the bodged coach chassis for awhile, though I think I've worked out how I'm going to fix it later but I think the next coach will have to use the Mainly Trains undeframe. Since it will be a Shirescenes Diag. T36 involving replacing the Ratio sides with etched ones I might as well go the whole hog. Incidentally two of the Ratio kits, the Composite Diag U4 and the all third S9 did actually run on the Tanat valley.
Since I know this first one is compromised by my construction mistake I thought I would take the opportunity to experiment a little. I was going to avoid coaching stock until I saw Chris Nevard's anachronistic version of the Ratio kit. So I've painted one side of mine in BR Maroon and the other in all over Western Region brown to see which I think looks most believable. I think the brown will win, since I know that in rela life some of the 4 wheelers were running in all over brown at the end of their life and there is at least one picture of the TVR from 1947 which appears to show an S9 in that livery.
Since it is just an experiment I might even have a go at giving it cream paneling, just to see if I can do it. I know that must sound like a trivial task to some of you, but I've always struggled with it using enamels. I'm hoping the lifecolor acrylics will make it easier. Incidentaly the Lifecolor BR maroon is an odd colour to work with. It takes quite a few coats for the colour to build up and until it does you can't help wondering how it could be right.
One of Those Days
Some days things just work really well, others seems to go wrong from the start.
The day before yesterday things were going well. The baseboard was in place, I'd figured out the best way to operate the turnout, and goodness knows why but I was beginning to convince myself that perhaps even that switch to EM gauge was within my grasp, egged on by the discovery of just how cheap the Ultrascale conversion kit for for the Sentinel is.
Yesterday though began badly with the step-daughter letting all four toy poodles into my bedroom at far too an hour, a misdemeanor compounded by the fact that one of our cats was already in prior residence. It wasn't a peaceful awakening.
When I unpacked the point motor I had carefully checked the thin wire supplied to connect it to the tie bar and then re-secured the wire into the box. The wire is now nowhere to be found. It was when I discovered it was missing that I should have given up on the day from a modeling perspective.
Instead I went and ploughed on with the Ratio 4 wheel coach kit.
I love those reviews of a kit that that is either very basic or very complicated that conclude with "There is no reason why the careful beginner could not make an excellent job of this"
I know that some beginners produce stunning work. I suspect they also benefit from excellent close up vision, good hand eye co-ordination, live alone, and before embarking on their first project have already amassed a carefully organized micro-workshop.
However careful they are I doubt their vision means that one eye is convinced things are at least an inch away from where the other eye places it, that they need an obscene number of cups of coffee to get through the day, share a house with far too many pets and has a workshop that shares desk space with the home office and digital darkroom. Once upon a time I did have a decent set of tools but they got "mislaid" during a house move.
So what followed was an unmitigated disaster.
We will skirt over the bit where I remembered too late why you don't use the home decorator size brush in the lid of a bottle of poly to apply the stuff to anything delicate, awkward to hold or hard to get at. We might even miss the bit where I recalled that on old kits cutting off the badly moulded location pips and aligning things by eye and measurement is usually easier. No, actually lets go back to that one. I was focused on following the Ratio instructions about which sprue pips to leave on for location purposes, and also had read lots of warnings about how difficult the lower stepboards were to remove from the sprue that I failed to notice that the horizontal cut out at one end in the stepboard was missing on both mouldings. Had I picked up on that whist the mouldings were still on the sprue it would have been relatively easy to rectify.

As it was I didn't discover this until I was trying to work out why I couldn't get the stepboard to fit the way I'd expected, so ended up glueing them in the wrong position, too far forward and too low, and the only way I have of rectifying it would mean a lot of bodging.
I'm tempted to chalk this one up to experience, finish building the body, and then build a replacement using the Mainly Trains etched underframe.
Then on top of everything else my jigsaw died on me whilst I was cutting the end boards to allow connection to the fiddleyards.
Sunday, 28 October 2012
Rolling Stock
So far this has not been high on my list of priorities. The basic idea has been to get enough stock together to "operate" the line initially - given the limitations of operation on such a basic layout, and then to add stock primarily for display and photography.
The real Tanat Valley Railway was a haven for attractive, quirky GWR tank locos and most of them are available in 4mm scale. In the period the model is set most of those had gone and a 14xx is really the obvious loco. I haven't had a good look at the latest Hornby version but from what I've seen I suspect it would still benefit from a lot of extra work. It would be as easy to build the GEM/Mainly Trains Cambrian 2-4-0, but of course that never lasted into the early BR period the model is set in.
A Bachmann Pannier or 45xx are the other RTR choices. I've always had a soft spot for the 45xx, but it is a little large for the TVR in GWR days.k. Some tender locos did work the line including a Deans Goods and a 2F OO Works used to have one of those available. In BR days Ivatt class 2s seem to have been the common motive power, though I've not seen a picture of the tank version on the line. was the axle loading slightly higher? The Dukedogs never worked on it as far as I know, but one is definitely on my shopping list
An outside bet would be the Anglicized Electroten 0-6-0 saddle tank but that would also need some work to be convincing.
In the long term there are a lot more options for kit built locos. Then in the long term if I'm going to move to C+L track I might as well go EM, so why rush?
Oh yes, and because I quite like diesels an 08 and a 24 are both on the list.
Wagons shouldn't be a problem. A couple of vans, a couple of mineral wagons, a neglected ex PO wagon, and perhaps a gunpowder van for use at the quarry.Obviously a Toad is a necessity and I think that will have to be the Frogmore AA3 kit.
In theory the model is set after passenger services have been withdrawn. Not only do I like the atmosphere of overgrown stations but also a lack of passenger traffic will hopefully aid the deception that this is a "bitsa" station design. Having said that I have a Ratio 4 wheel GWR coach in the works for no better reason that this kit has been my nemesis in the past and I'm determined to build one to a quality that satisfies me even if it will end up in an unprototypical maroon livery. An old Triang clerestory brake could masquerade as dia, E40, and I'm tempted by the Comet Collett driving trailer.
I suppose they might have tried an AC railcar out on a line like this....
Saturday, 27 October 2012
The Little Things Add Up
With this month's pay in the bank it is time to think what the key things are I want to achieve in the next month. Only a small part of my hobby budget is supporting this project, and in any case I suspect my time is going to be constrained with the possibility of spending the bulk of November working away from home.
As I mentioned in an earlier post even a small layout like this can soak up money if you don't already have lots of things lying around.
The key thing in November is going to be getting the track laid,with the point working both mechanically and electrically, the wiring done and at least enough of the scenics done to get over the dreaded bare baseboard syndrome.
Track in theory is to hand. I say in theory because the more I look at the sleeper spacing on the Tillig track the more I find myself thinking about moving to C+L track.
I've definitely decided to go for the simple mechanical switching of the turnout using a sliding switch, as long as I can make it work.
Wiring should be really really simple on such a straight forward track plan,. Should be, but because I want toi experiment with DCC I'm going to use a bus with dropper wires, but I'm hoping that like most jobs I can fit it all into one evening.
Scenics is the classic case it seems where reverse economies of scale come into play. Small packets are horrendously expensive for what you get but I don't want to end up with a big stock of material I might never use. After all I've got no concrete plan for the the next 4mm layout and suspect it won't happen until after another house move. Still I've bitten the bullet and enough bits and pieces should be heading my way to at least sketch out the groundwork.
Then I can get on to the bits I'm actually looking forward to, rather than seeing as necessary evils. There is the distinctive overbridge to build, the typical Tanat Valley corrugated goods shed and station and the signal box.
OK I'm not sure I'm looking forward to the signal box. I've got a Ratio GWR kit in store but really it needs the staircase on the other side to fit the site. Given the amount of kitbashing that will be needed to achieve that, and that the design still won't be genuine Tanat Valley I might have to scratchbuild that as well and I'm not sure that is a task within my comfort zone.
Some power would be nice as well, so I'm hoping my DCC controller will arrive soon.
I ought to start thinking seriously about rolling stock as well at some point. Obviously I'm going to need a Toad, and as far as I can make out the only way to get one which is even relatively accurate will be by building an etched kit. I suppose I'm going to have to select a loco that makes sense as well. The Sentinel is fun, but not really believable in context.
Thursday, 25 October 2012
Baseboards
I've been feeling rather guilty for the last week for not having made progress on the baseboard. In my defence I've spent a lot of time thinking about building it but I've kept coming across little problems with my plans. Some are real, some turned out to be less of an issue than I first thought, and some still caught me off guard.
Also in my defence I give you Exhibit A: The baseboard.

Trust me you don't want to get any closer than that. I seem to have lost the knack of cutting a good clean edge.
It is made from 5mm thick foamboard - sometimes called Kappaboard but I actually used Gerstaecker's product which worked out to be the cheapest option I could find. A simple 5cm deep tray with diagonal bracing underneath assembled with a hot glue gum and the aid of FoamWerks L-clips to keep things sort of squarish. Sadly at 65cm in length the boards are not quite as wide as the full interior space of the Apa box. That means there is a 4mm gap at each side. If I had thought about this even for a minute the solution would be obvious; just use two sections of board rather than one with a joint in the middle. If I keep the layout as a self contained diorama it isn't an issue since the backdrop will sit in front ot the gap, but if I'm going to allow for connection to some sort of fiddle yard at one or both ends then I'm going to have to do something about it.
If I were to follow my own advice I would throw this version away and re-do it.
However, when did I ever follow my own advice?
The truth is it sort of helps sort out another problem I had because the gap makes it easier to remove the sub-base to work on it. Useful as I'm expecting to do the bulk of the work on it outside of the Apa carcass. My long term solution to the issue is tied in to the construction of the fiddle yards, which will also be designed to fit inside Apa boxes. That is, if I build the fiddle yards.
You might have noticed that the baseboard is deeper than the wooden stringer at the front of the box, and also that I've built in an overhanging lip. The lip will get reinforced and will be the key to fitting the baseboard in and out of the box. The depth is to allow for a point motor to fit. The Tillig point motor is quite shallow and might just have fitted if I'd made the board flush with the wooden bar, but I would rather give myself a little more space to work in.
I'm having second thoughts about the point motor anyway. My main reason for using it is a proof of concept to myself about using DCC operation of turnouts, but in the interests of simplicity of both construction and operation I'm tempted to use a manual rod-operated control built from a DPDT switch, with the rod exiting at the front of the board.
I'll leave you with a picture of some track and stock in place whilst I mess around with the final track layout. What did I say in my last post about not using the Model Rail Sentinel?

Copy Catcott
Having only recently considered a serious return to the world of indoor model railways I find myself faced with a familiar dilemma from the garden railway world: The danger of falling into the habit of copying other modelers rather than the prototype.
It is easily done, particularly with so many high quality modeling resources available in the model shop, the newsagents, and on line. Just look at the list of layouts in my links bar. I'm quite open about the fact that Chris Nevard's Catcott Burtle was the catalyst for my return, and I'm sure for many others, by proving what realistic results can be achieved with a mixture of out of the box products and a manageable amount of kit bashing and scratch-building.
My fear is that someone, worst of all me, will take one look at the finished Apa Vally and think "That's a poor man's Polbrook"
It is a bit like those amateur photographers who, whether consciously or not, waste their time trying to emulate a fashionable style of picture, rather than finding something distinctive to say. Of course that isn't a waste of time if you work out how to take a certain kind of shot, then disassemble the techniques and combine them with others to come up with something original.
Ian Stock, who has done so much to raise standards of realism in the garden - and whose N gauge layout will be featuring in the Railway Modeler in the New Year - talks a lot about authenticity. For me I guess there are two components to this authenticity. A layout needs to represent a perceived reality effectively, and it needs to have aspect of the builder's personality and skill embedded in it.
I'm going to have to work hard to ensure that on such a small layout I don't inadvertently add any elements that are pure modeling cliché. As I write that I can already reel off a list of elements that are just that. The hard choices this might involve include the choice of rolling stock, the scenic methods used, and the general feel of the model. In theory that means no Sentinel shunter, no Planet diesel, no Ratio 4 wheel GWR coach, no Morris Minor in the goods yard, no grass from teddy bear fur and not being able to use those excellent laser cut flowers.
Hmm, on the other hand imitation is the sincerest form of flattery....
Thursday, 18 October 2012
Tracking Progress
Eight hours of non-stop interviewing yesterday didn't give me much of a chance to make progress. Here's a shot though of the quickly weathered Tillig track in conjunction with the ready ballasted Tillig trackbed.
The concept of the trackbed is good, and it certainly helps with getting sleepers correctly spaced and aligned. Getting the track into the trackbed is a nightmare though. Even with plain track I found it virtually impossible to push the sleepers down without the rail coming out of the chairs, so for this short test section I resorted to putting the sleeper section in first and then sliding the rail in. Not something I fancy doing with the pointwork. Not only that but the trackbed for the points looks like it needs a lot of work to actually get the point to fit.
[Update: Having got hold of the Tillig catalogue you are apparantly meant to heat the trackbed with a hairdryer before pushing the track into place, it then contracts again as it cools to hold it in place.]
The ballast itself is a little large for my liking as well so I guess this is one of the ideas I'm not going to pursue.
 |
| Tillig track in preformed trackbed |
[Update: Having got hold of the Tillig catalogue you are apparantly meant to heat the trackbed with a hairdryer before pushing the track into place, it then contracts again as it cools to hold it in place.]
The ballast itself is a little large for my liking as well so I guess this is one of the ideas I'm not going to pursue.
Tuesday, 16 October 2012
Big Toys
As promised yesterday here are some details of one of my alternative schemes for filling up an Apa box. In this case a 16mm quarry using Faller e train track, a battery powered Simplex loco built by Brian Dominic from an old Saltford models kit, and some Andel quarry wagons

My original plan was to build the units to be operable without any sort of fiddle yard, but I've given up on that purist approach, which makes this scheme a bit more worthwhile. If I really put some effort in to it I reckon I could the 16mm scale layout up and running over a weekend, but what would be the fun in that, so for now it remains an idea for the future.

My original plan was to build the units to be operable without any sort of fiddle yard, but I've given up on that purist approach, which makes this scheme a bit more worthwhile. If I really put some effort in to it I reckon I could the 16mm scale layout up and running over a weekend, but what would be the fun in that, so for now it remains an idea for the future.
Monday, 15 October 2012
Back on Track
So I think I might have come up with a workable approach to painting the track.
Spray can of Halfords matt camouflage khaki, followed by a glaze of Lifecolours Sleeper Grime/Tensocrom medium, and then dry-brushing the chairs.
I've tried quite a few other alternatives over the last twenty four hours. Some of them looked a lot better, and I've picked up some ideas for painting other examples of worn timber, but this seems the best compromise between effort and effect.
You might have noticed that the picture is of a Peco On16.5 point, not a Tillig HO one. That's because this belongs to one of the other three Apa based projects I've got in the queue. This one is a 7mm scale tramway based extremely loosely on the Kinver Light Railway.. Tomorrow I'll look at the 16mm scale idea.
Spray can of Halfords matt camouflage khaki, followed by a glaze of Lifecolours Sleeper Grime/Tensocrom medium, and then dry-brushing the chairs.
I've tried quite a few other alternatives over the last twenty four hours. Some of them looked a lot better, and I've picked up some ideas for painting other examples of worn timber, but this seems the best compromise between effort and effect.
 |
| Peco On16.5 point, suitably treated |
Sunday, 14 October 2012
One Step Forward, Two Steps Backward
I've entered into this project with my eyes open to the fact that I'll get things wrong, and that getting things wrong is fine if I learn by the mistake and get it right next time.
Both my recent "mistakes" relate to paint and weathering.
After a lot of soul searching I've decided I'm just not happy with the results I was getting from using the Modelmates sprays on rolling stock. It just seems counter intuitive to me to spend more time trying to remove weathering than trying to apply it subtlety in the first place. So I've swapped to using Lifecolours from Airbrushes.com I have to say that I'm finding them much easier to work with. I just wish now that I'd totally removed the Modelmates weathering first, but then the ply van was always intended to be a bit of a guinea pig. Actually I think starting afresh I would begin by painting the van body using Lifecolours BR Bauxite rather than weathering on top of the out of the box Bachmann finish.
I'm also facing multiple problems painting the Tillig track. The first problem is that it has highlighted how bad the lighting is in my home office where I'm working.What looks fine under artificial light looks terribly deficient under sunlight. This isn't about the colour temperature, because the colours are turning out as I'd expected, but simply not having enough light to see to paint as accurately as I want.
The plastic trackbase is also causing problems. Acrylics seem to cover it well, but the adhesion seems poor and even the gentlest attempts at weathering it cause the paint to lift. I think I'm going to end up removing the rail from the trackbase and spraying the base with the always useful Halfords primer.That's fine for plain rail, but I'll have to mask the points and spray them in assembled form.
On top of that picking out the Tillig chairs in a rust colour has highlighted them so it becomes even more apparent they aren't GWR/BR design.
Still, we persevere.
Wednesday, 10 October 2012
What's the Point?
You might be asking that after reading my earlier posts on the arguments against micro layouts. The point for me is to try out some new ideas, and to bring me a bit more up to date with indoor modelling techniques before I return to the garden railway in Spring.
If, on the other hand, your question is "What's the turnout?" then the answer is this:
It is from the Tillig Elite HO range, which has a bit of a following amongst those trying to work to finer OO gauge standards. It has some nice features, for instance the rail is dull and the point blades aren't hinged, and code 83 rail is a sensible compromise. On the downside they need an external latching mechanism, have a reputation for being comparatively fragile, and clearly the track has HO sleeper spacing and continental style chairs.
I was very tempted to go for C+L track, but if I had done I would have ended up persuading myself to go EM gauge. I dabbled with EM as a teenager, and I'm not completely discounting it if I build another 4mm layout.
I did say I was going to start work on the baseboard yesterday, but work intervened and I didn't want to rush such a crucial part of the build. Instead I amde a start on painting and weathering the track. It makes a big difference to the appearnace.
If, on the other hand, your question is "What's the turnout?" then the answer is this:
 |
| Tillig Elite 15 degree turnout |
I was very tempted to go for C+L track, but if I had done I would have ended up persuading myself to go EM gauge. I dabbled with EM as a teenager, and I'm not completely discounting it if I build another 4mm layout.
I did say I was going to start work on the baseboard yesterday, but work intervened and I didn't want to rush such a crucial part of the build. Instead I amde a start on painting and weathering the track. It makes a big difference to the appearnace.
Tuesday, 9 October 2012
Making Life Complicated
As will be apparent as things progress I am inherently lazy and prefer to take the easy option if it is offered to me. I also like the fundamentally simple approach, as will be obvious when you see my solution to the fiddle yard issue,
Yet sometimes I just can't help complicating things. For instance I'm planning to wire the layout for DCC operation, which on the surface is overkill but I have my reasons. I'm also planning on motorising operation of the turnouts. Oh, did I say turnouts in the plural, because I think up to now the plan has only involved one of them?
I haven't fully made up my mind yet, but I'm leaning towards adding a headshunt. It is bothering me that if I don't put a headshunt in then there should be a catchpoint instead, and one of those isn't available in the track range I'm using. In the highly unlikely scenario where the layout ends up on public display a headshunt would also be a useful adjunct to improve operation, or simply somewhere to leave a loco or wagon out for the punters to count the rivets.
The Argument Against : Time and Cost
In what I promise it the last article aimed specifically at putting the beginner off the concept of of micro layouts for good I want to look at the interlinked, issues of time and cost.Now, in the past I've been produced to several times micro layouts, at virtually no no cost, and and in little more time than it has so far taken me to set up and write this blog. So far Apa Junction, has taken me a lot of longer and I already don't like to think about the cost. The big difference to is that in building. The earlier this layouts I had the advantage of a well stocked scrapbox full of useful leftovers like track, electrics, buildings, wagons, scenic items...... The list goes on.
Now starting from scratch after the a long time away from indoor modelling I'm having to buy every day one of those who things, and gosh the cost adds up. Fine if you can spread the cost out over a period of time as I'm trying to do, but with a micro layout that isn't so easy. With a a normal sized layout you can focus on one element at a time so it is easy to put off a purchase until you really want need it whilst the still feeling you are making progress. That's why much harder to with a few micro layout for two weeks reasons. Since the different design elements are tightly coupled tasks often need to be done together.
 |
| A "scale" drawing in WinRail11 gives quite a different view.... |
 |
| ....compared to mock up in the real world |
I would be loath to lay track without already having buildings and stock to hand to check both physical clearances and also the aesthetics of the scene. So a lot of my time is being spent buying and building individual components before I've even cut the first piece of of foamboard for the baseboard., and and without the getting much sense of progress.
I happen to to think that the model railway station trade, including the both large and small manufacturers, importers provides a us with remarkable value for money. That doesn't sound mean though that things are cheap. It is also true that a micro layout needs less of everything than a big layout. A lot less still means you need a lot though - see my earlier list of things sourced from the scrapbox. Even if you only need one engine it will still cost a fair amount of of money, and if you want to build a worthwhile micro layout. then you'll be want to buy a loco that is reasonably highly detailed to stand the close scrutiny it will get. Small quantities of the some items simply click might not be available, and or if they are then only at a high unit cost. I began shopping for all the different types varieties of scenic material needed to provide the range of ground cover, and hedges and trees I want to for Apa Valley and had to break it down into several times orders to make it manageable. Of course at the end all the leftovers can go into the scrapbox to kick start your the next project, but there will also be a lot of items such built in into the micro layout that it won't be be possible to to re-use.
Monday, 8 October 2012
The Argument Against: Skill
In my last post I raised the difficulty of designing a good micro layout and why there are many pitfalls for an absolute beginner. In this post I want to look another commonly held view; that micro-layouts are a good way for the beginner to develop skills that will be useful building a full size layout.
There is certainly merit in this idea, especially if you follow the golden rule:
But there are several reasons why it also falls apart as an argument. First and foremost amongst these I guess is that as you would expect the most satisfying cameo layouts tend to be those built by the most experienced modellers. You'll find a fair few listed in my links section. Undoubtedly the micro-layout is considered a legitimate branch of modelling. But you'll also find a big gulf between these models and the run of the mill micro-layout where all too often the format seems to be an excuse for unrealistic whimsy and poor workmanship. At this point I have to declare a certain affinity for whimsy of the Emett persuasion and a track record of poor workmanship. Do as I say, not as I do.
The truth is that the format means any layout will be subject to close up scrutiny, and the evidence of a lack of skills will be all too visible. Because the whole layout can be taken in in one view, and because for effect a diorama depends on all the elements working together and one element being sub standard will ruin the illusion. In contrast a larger layout gives you more room for the mistakes to get lost in the bigger picture.
The other issue I have is how many useful skills can you actually learn in building a very small layout? Undoubtedly you can try out a very limited range of scenic techniques, and some basic track laying and wiring but that's about it, and to be honest trying to learn those techniques in the small space of a micro layout probably isn't the best idea. Esoeciually when you take into account the time and cost involved....
There is certainly merit in this idea, especially if you follow the golden rule:
"If it isn't right, throw it in the bin"
But there are several reasons why it also falls apart as an argument. First and foremost amongst these I guess is that as you would expect the most satisfying cameo layouts tend to be those built by the most experienced modellers. You'll find a fair few listed in my links section. Undoubtedly the micro-layout is considered a legitimate branch of modelling. But you'll also find a big gulf between these models and the run of the mill micro-layout where all too often the format seems to be an excuse for unrealistic whimsy and poor workmanship. At this point I have to declare a certain affinity for whimsy of the Emett persuasion and a track record of poor workmanship. Do as I say, not as I do.
The truth is that the format means any layout will be subject to close up scrutiny, and the evidence of a lack of skills will be all too visible. Because the whole layout can be taken in in one view, and because for effect a diorama depends on all the elements working together and one element being sub standard will ruin the illusion. In contrast a larger layout gives you more room for the mistakes to get lost in the bigger picture.
The other issue I have is how many useful skills can you actually learn in building a very small layout? Undoubtedly you can try out a very limited range of scenic techniques, and some basic track laying and wiring but that's about it, and to be honest trying to learn those techniques in the small space of a micro layout probably isn't the best idea. Esoeciually when you take into account the time and cost involved....
The Argument Against: Design
I have a thing about micro-layouts, cameos or moving dioramas, call them what you will. Over the years I've built quite a few, including the oddity half way down this page , an Inglenook layout in the garden.
Sometimes a little caution is needed, especially where beginners are concerned. It is very easy to presume that a micro layout is a good starting point for a beginner. In fact in finescale circles the first micro layout to try out techniques such as track laying has become something of a rite of passage. There is a big difference, though, between an established modeller making a change of scale or standards, and the absolute newcomer.
Now I'll come clean and admit that two of the ideas at the back of my mind are both based on someone elses concepts, but neither of them will get built until I've done an awful lot of exploring of those concepts with dimensioned drawings, full size track templates and dummy buildings to check that they actually are workable.
As well as the practical aspects, such as allowing for sufficient clearances, there is also an aesthetic aspect to consider. Many years ago Roy Link published a Railway of the Month in the October '78 Railway Modeller under the title "The Art of Compromise". It was a simple 6ft by 1ft GWR branchline intended to use then commonly available card models for the structures. By coincidence at the same time that I managed to track down the back issue with it in the plan was republished in the October 2012 RM to accompany an article on a layout built to the plan. Obviously I wasn't the only person it made an impression on all those years ago. Yet look at the layout in the flesh and you notice two things. The first is how much tighter the space is in the real world than on the drawing board, even though the builder has actually built it on a larger baseboard. The second is that the builder has made a subtle, possibly unconscious, shift in the setting of the line. Roy's original plan was clearly set at the end of a very rural line, probably miles from the nearest settlement, and almost certainly with the name "Road" in its name as a hint to the hopeful traveller that a long walk awaited them before they could get to their final destination. The version presented in 2012 has the hustle and bustle of a station in the middle of a settlement, there are buses and taxis parked outside the station and barrow loads of luggage waiting to be loaded onto the train. Key buildings have been increased in size, so the waiting shelter has become a full blown station building. The result is a different kind of compromise altogether. A good "home" layout in the style of many Railways of the Month twenty years ago,and one I can imagine many wanting to emulate, but too much of a quart in a pint pot for me. The art of the micro-layout is putting a pint in a pint pot, with just enough head on top.
So getting the design right can be a real challenge, and small mistakes and inaccuracies get magnified and can end up as a big mistake that ruins the whole layout. If you want an idea of the challenges design poses even for very experienced modellers then have a look at the story of Roy Link's own Crowsnest Tramway.
Sometimes a little caution is needed, especially where beginners are concerned. It is very easy to presume that a micro layout is a good starting point for a beginner. In fact in finescale circles the first micro layout to try out techniques such as track laying has become something of a rite of passage. There is a big difference, though, between an established modeller making a change of scale or standards, and the absolute newcomer.
Design
How hard can it be to design a micro-layout? Well quite hard actually if you want it to appear both believable and attractive from all the likely viewing angles, and especially so if you have aspirations towards any sort of half decent operation. OK there are a lot of designs already out there, but some of them can be quite misleading unless you know the exact dimensions. Even small differences can make big differences to the practicality of schemes in small spaces. Be particularly wary of trying to shoehorn in slightly smaller versions of trackplans you admire, or building layouts based on someone elses conceptual sketch.Now I'll come clean and admit that two of the ideas at the back of my mind are both based on someone elses concepts, but neither of them will get built until I've done an awful lot of exploring of those concepts with dimensioned drawings, full size track templates and dummy buildings to check that they actually are workable.
 |
| Never trust someone elses back of the envelope sketch, Especially not one of mine. |
As well as the practical aspects, such as allowing for sufficient clearances, there is also an aesthetic aspect to consider. Many years ago Roy Link published a Railway of the Month in the October '78 Railway Modeller under the title "The Art of Compromise". It was a simple 6ft by 1ft GWR branchline intended to use then commonly available card models for the structures. By coincidence at the same time that I managed to track down the back issue with it in the plan was republished in the October 2012 RM to accompany an article on a layout built to the plan. Obviously I wasn't the only person it made an impression on all those years ago. Yet look at the layout in the flesh and you notice two things. The first is how much tighter the space is in the real world than on the drawing board, even though the builder has actually built it on a larger baseboard. The second is that the builder has made a subtle, possibly unconscious, shift in the setting of the line. Roy's original plan was clearly set at the end of a very rural line, probably miles from the nearest settlement, and almost certainly with the name "Road" in its name as a hint to the hopeful traveller that a long walk awaited them before they could get to their final destination. The version presented in 2012 has the hustle and bustle of a station in the middle of a settlement, there are buses and taxis parked outside the station and barrow loads of luggage waiting to be loaded onto the train. Key buildings have been increased in size, so the waiting shelter has become a full blown station building. The result is a different kind of compromise altogether. A good "home" layout in the style of many Railways of the Month twenty years ago,and one I can imagine many wanting to emulate, but too much of a quart in a pint pot for me. The art of the micro-layout is putting a pint in a pint pot, with just enough head on top.
So getting the design right can be a real challenge, and small mistakes and inaccuracies get magnified and can end up as a big mistake that ruins the whole layout. If you want an idea of the challenges design poses even for very experienced modellers then have a look at the story of Roy Link's own Crowsnest Tramway.
Saturday, 6 October 2012
"The Longest Journey Begins...
...with a single footstep."
Or in this case the smallest layout begins with a single wagon.
I've been slowly stockpiling bits and pieces for a few weeks now. One of the myths of micro layouts is that they are always cheap and quick to build, an issue I'll address in my next post, but for now take it from me that it can end up being an expensive business when you are starting from scratch. Amongst my earliest purchases was the Model Rail Sentinel shunter to provide some motive power, and the first wagon was this Bachmann 12t plywood ventilated van.
There are some excellent ready weathered wagons available and they do a weathered version of this, but it didn't happen to be in stock at the time. Trust me, had it been I would have bought it because I don't intend to make unnecessary work for myself.
Out of the box, as you might expect from a plywood sided wagon, it looked very flat, not helped because in my opinion self coloured bauxite plastic never looks right. So I took the chance to try out some Modelmates weathering dyes. The jury is definitely out where I'm concerned. In the past I've used weathering powders and I found I had much less control with these sprays. I'll persevere though, and will give the underframe a little more dedicated attention. I also did the usual trick of covering the roof with a single ply of toilet tissue soaked in solvent which makes a big difference. The other obvious task to do is to add vacuum pipes.
Or in this case the smallest layout begins with a single wagon.
 |
| Weathered Bachmann Plywood Van |
There are some excellent ready weathered wagons available and they do a weathered version of this, but it didn't happen to be in stock at the time. Trust me, had it been I would have bought it because I don't intend to make unnecessary work for myself.
Out of the box, as you might expect from a plywood sided wagon, it looked very flat, not helped because in my opinion self coloured bauxite plastic never looks right. So I took the chance to try out some Modelmates weathering dyes. The jury is definitely out where I'm concerned. In the past I've used weathering powders and I found I had much less control with these sprays. I'll persevere though, and will give the underframe a little more dedicated attention. I also did the usual trick of covering the roof with a single ply of toilet tissue soaked in solvent which makes a big difference. The other obvious task to do is to add vacuum pipes.
Apa Junction
I have a number of schemes in mind to fit into these useful storage boxes. Apa Junction is my first attempt at 4mm standard gauge modelling since....well since my original Triang OO gauge trainset I got for my sixth birthday with "Albert Hall" and three Pullman coaches.
The prototype inspiration for the layout is the Tanat Valley Light Railway. This delightful little Welsh line has a number of things in its favour. Notably it has been extremely well documented in Mike Lloyd's Wild Swan monograph, secondly it featured lots of corrugated iron buildings, for which I have a strange weakness, and thirdly Mike's book for once includes copious drawings of those structures; Too many books on full size railways seem to ignore the fact that a sizable part of their readership is interested in modelling.
The Tanat Valley has been modelled many times before, in particular there is an exquisite 2mm version of it, but then as I said in the introduction to this blog you aren't going to find much that is original here.
I have a vague recollection that John Allison, the doyen of Warley Model Railway Club, built an O gauge small space modern image layout based on Blodwell quarry, whicgh was served by the TVLR.
I've chosen to set the line in the period just pre-Beeching, which seems reasonable given the real life chronology of the line. The main location that it is based on is Blodwell Junction, but obviously compromise is the name of the game given the dimension it has to fit in.
Introduction
This blog is about an experiment in railway modelling. Well that isn't strictly true because just about everything it might end up covering has been borrowed from elsewhere, so actually it is about tried and tested railway modelling techniques. The experimental aspect is that "I" haven't tried any of them before, or at least not for so long that I've forgotten how to do them.
The other unifying theme is that it revolves around the construction of micro layouts to fit into the IKEA Apa storage box. Like the rest of this blog there is nothing original in this, Ian Holmes has been writing on the topic for sometime and successfully exhibiting such layouts. Ian's is one of those names that keep popping up when I search the internet for ideas and inspiration. The other key ones that have influenced me will appear in the links section, but the catalyst for all this has to be Chris Nevard's layouts which have shown many of how careful use of RTR items in a relatively small space can produce a convincing layout that only a few years ago would have been beyond reach of all but the most gifted modellers.
Which is just as well, because I'm not a gifted modeller, or even a reasonably skilled one. Not only that but apart from the occasional foray into OO9 I've spent most of the last twenty five years focusing on 16mm scale narrow gauge railways in the garden
 |
| "Hales" My OO9 Micro Layout from the 1990's |
Subscribe to:
Comments (Atom)