Whilst I'm still getting to know my new "proper" camera, a Fujifilm XE-1 I've also just said goodbye to my old Leica D-Lux compact camera, which has found a new home with my step-daughter.
My compact cameras have a hard life.They usually live in my pocket or thrust into a bag and get used pretty much every day. The D-Lux has stood up to it well, and bears the scars to show it. In four years it has only let me down once. It sits in the select group of compact cameras I've owned that produced photos that punched above their weight.
However, technology moves on, and earlier this year I realised that I was using the camera on my Galaxy S4 phone more than the D-Lux, even when I had the D-Lux with me, as on the Crich grice.
With a lot of travel planned for the rest of this year I decided it was time for a new travel camera. As usual I went for last year's model to get a good price, and opted for the Panasonic TZ40 I've been using Panasonic compact cameras for ten years now and they've all been good. Even the D-Lux is a Panasonic under the Leica branding.
After the D-Lux, it does feel rather light and plasticky and although it promised a massive 20x zoom range I wasn't expecting most of that range to be usable. It has built in GPS, which I find useful when taking photos on cycling trips and WiFi, which perhaps is a bit of a gimmick.
Or is it?
One thing you can do is link it with your mobile phone and as well as using it as a remote viewfinder and shutter release you can also use the phone to operate most of the other camera functions. Combined with a surprisingly good macro capability and touch screen focusing this suddenly opens up the possibility of taking some interesting layout shots with the camera crammed into otherwise inaccessible positions. Like this one taken with the camera right against the backscene.
I'm still getting to grips with it as a general purpose camera, in particular trying to work out the limits where image quality starts to suffer. The large zoom range is more usable than expected, thanks to good image stabilisation. In fact in good light even the further extended "digital zoom" is usable sometimes. On the downside low light performance isn't anything to write home about, and the in-camera processing of the JPEGs is a bit extreme for my liking, especially since saving images in RAW isn't possible.
Although as usual I went for a camera that allows full manual override I have been very impressed with the Intelligent Auto setting that chooses settings for you and I'm beginning to trust it. Oddly using the XE-1 I find myself setting everything but ISO to manual but I'm not proud and don't mind using automatic settings when they are available.
All in all I'm relatively pleased with it, whilst sad to see the D-Lux go.
Moving from an OO gauge micro-layout to an EM gauge compromise, via a rather major diversion into both 7 1/4" gauge and minimal space OO9
Labels
Layout Design
Blodwell
Buildings
The Art of Compromise
Photography
Llanrhaiadr Mochnant
Scenery
Signal Box
Baseboards
Goods Yard
Track
45XX
Apa Box
EM
Lcut Creative
Travel
Backscene
Concepts
Railway Exhibitions
TVR
USA
Upwold
14XX
Anyrail
Bridge
Cuba
Cycling
Fencing
Lorry
Narrow Gauge
Point rodding
Points
Templot
Turnouts
West Maryland
Books
C+L
Fiddleyard
GWR
Hales
OO9
Phil Parker
Rolling Stock
Signals
State of the hobby
Tillig
Warley
Weighbridge
trams
2012
AC Railbus
Albion Yard
Allt-y-Graban Rd
Apa Valley
Balloch Pier
Bas
Bath Green Park
Brickwork
Bridgnorth
Bryn-y-Felin
CSX
Charmouth
Clarendon
Class 25
Cliff Railway
Coldrennick Road
Corris
Crich
DCC
Disused Railways
Dukedog
EMGS
Edwin Smith
Electrics
Emett
France
Gloucestershire & Warwickshire
HO
Hobbies
Hope under Dinmore
Hospital Gates
Iain Rice
Iliffe Stokes
Inspiration
Ireland
Kings Lynn
La Baraque
Lasercut
Leamington & Warwick
Locos
MSTS
Mainly Trains
Military Modeling
Mishaps
N guage
NEC
OOn3
Percy
Pier Railway
Porth y Waen
Preserved Railways
RTR
SMP
Seend
Sentinel
Sketchup
St Minions
Stockholm
TGV
TRAX
Tansey Bank
Techniques
Technology
Tim Horn
Trade
Trees
Ultrascale
Veldhoveh 1935
Watertank
Williamsport
diorama
manning wardle
painting
procrastination
pug
ships
simulators
Showing posts with label Lorry. Show all posts
Tuesday, 24 June 2014
Monday, 15 July 2013
Background
There is being busy, and then there is being ....well let us just say that I'm working rather hard at the moment which means the railway is slightly neglected.
Actually I'm not sure that isn't a good thing because time away from a project lets you come back to it with relatively fresh eyes, sometimes literally so.
I'm more certain now that I'm closer to rescuing the yard and platform surfaces now that they have really dried out. I've also reconsidered the back-scene, and think I'll be replacing my rough hand painted version for one of the recently released Gaugemaster photo back-scenes before they become too hackneyed.
I've bought some of the Wills point rodding to try out. It does look large compared to the MSE products I've been using so far, but I'm wondering if it might be a better choice for someone as hamfisted as me.
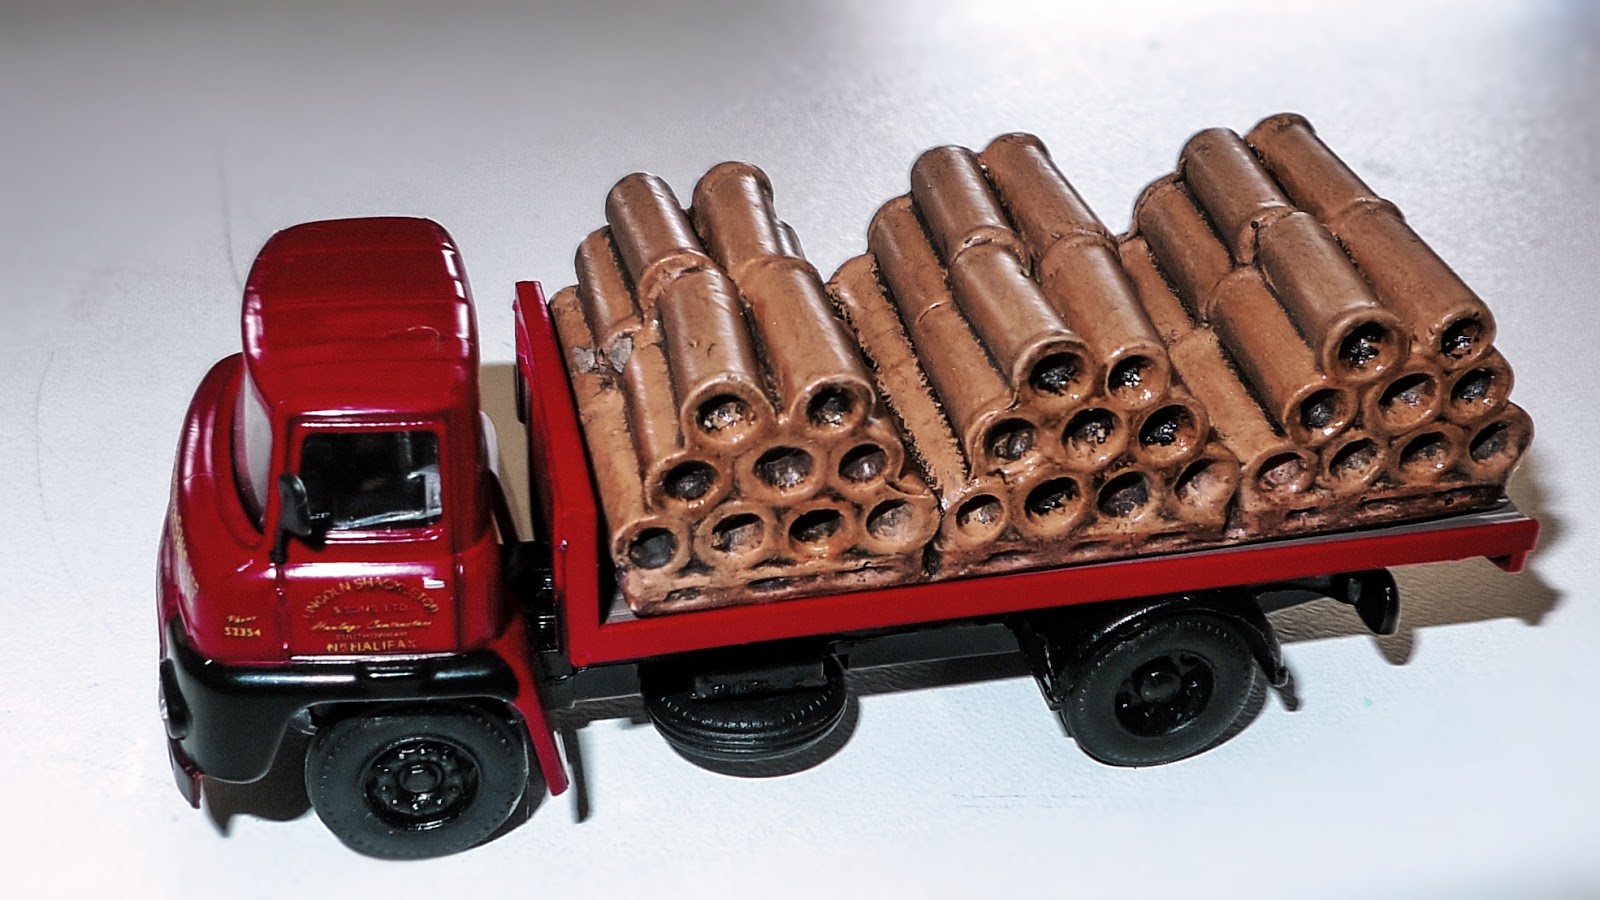
One feature of photos of the line towards the end of its life was the number of pictures of the goods yards that show large numbers of drainage pipes.What I don't know is if this is truly representative or just a coincidence, but I think they are going to have to feature in the next version. Harburn Hobbies do these palletised versions, that might just do the job, at least until I come up with a better solution. The lorry is another Basetoys one. On the plus side the cab is slightly more detailed than the AEC, and it is an example of a Leyland lorry of a type that features in some photos of the goods yards. On the downside the lovely signwriting proclaims that the owners hail from Nr. Halifax and this particular example was clearly assembled on a Friday afternoon.
Actually I'm not sure that isn't a good thing because time away from a project lets you come back to it with relatively fresh eyes, sometimes literally so.
I'm more certain now that I'm closer to rescuing the yard and platform surfaces now that they have really dried out. I've also reconsidered the back-scene, and think I'll be replacing my rough hand painted version for one of the recently released Gaugemaster photo back-scenes before they become too hackneyed.
I've bought some of the Wills point rodding to try out. It does look large compared to the MSE products I've been using so far, but I'm wondering if it might be a better choice for someone as hamfisted as me.
One feature of photos of the line towards the end of its life was the number of pictures of the goods yards that show large numbers of drainage pipes.What I don't know is if this is truly representative or just a coincidence, but I think they are going to have to feature in the next version. Harburn Hobbies do these palletised versions, that might just do the job, at least until I come up with a better solution. The lorry is another Basetoys one. On the plus side the cab is slightly more detailed than the AEC, and it is an example of a Leyland lorry of a type that features in some photos of the goods yards. On the downside the lovely signwriting proclaims that the owners hail from Nr. Halifax and this particular example was clearly assembled on a Friday afternoon.
Sunday, 26 May 2013
What a difference a day makes
I had been hoping to get to Railex this year, not having been able to go last year.
Unfortunately during the week someone stole my wallet with all my credit cards and the cash I'd earmarked for spending at the show, so that idea went out the window.
The good news is it meant I had a day at home on a Saturday when the wife was working and I wasn't, and that I decided to prioritse work on the layout.
I had a list of things I wanted to get done by the end of the day. Now anyone looking back through this blog will realise that I'm notoriously bad at keeping to my self imposed deadlines but for once I didn't do too badly.
It helped that on the Friday before work I finally fixed the point operating mechanism with a replacement DPDT switch - you don't need a DPDT for the electrics but generally they are larger than SPDT switches so provide sufficient mechanical throw to operate the point blades. A couple of quick remedial dabs with the soldering iron and I was back with a fully operational layout, meaning Staurday could be devoted to scenics.
I'd also used Friday evening to make a start on the replacement for the road bridge. The original version was built from card and scenic papers. I quite liked it but a decision to go for 3d corrugated textures on the goods shed and platform shed made me worry that the 2d look would be too obvious, so I swapped over to using Wills sheets. If anything these have more 3d texture than I would like.
Anyway by the end of Saturday the components of the new version were complete and painted, and I just need to assemble them. I'm not 100% happy with the colouring of either the stone or the brickwork but I think that just needs a bot of tinkering to sort out. Overall I think it is an imporvement.
The next thing you might note is that finally there is some ground cover in place. Shaping the polystyrene block to form the landscape was a bit messy since having dug out my hotwire cutter I couldn't find the resistance wire and had to resort to using a fretsaw. next time I'm going to use foamboard formers instead so that I have a little more control. The ground cover itself is hanging basket liner teased with a dog metal grooming brush. The great thing about this material is that it is thick enough to use to give more structure to the landscaping and also that joins are easily disguised. It needs mowing with scissors and then it form the base for further scenic treatments.
On my wishlist for purchase at RAILEX was a replacement body for my Base Toys lorry. Since I couldn't go I bit the bullet and very quickly fabricated a flatbed for it. In the background you'll see a platform is in place, and on it is a little balck shed....
This is the shed/urinal that was found, in some form or another, at the end of most platforms on the Tanat Valley. I'm afraid I miscalculated a few things when assembling this one so it is destined for the scrap bin, but building it was a useful exercise. This is the building which forced my hand to move to 3d sheets rather than printed paper because although there are some excellent corrugated iron textures available they wouldn't work for the free standing walls of the gents.
Finally here is an aerial shot showing the current stat of play. From my perspective the great thing is that from now on everything that needs to be done is easily broken down into jobs that can be fitted into a couple of hours here and there. I need to finish off the ballasting after I put in the point rodding, rebuild the gents, finish the signal box and build the goods shed and put down textures for the platform and the goods yard. Incidentally since the layout is set after the end of passenger services the platform is going to be modelled in an overgrown state. The black shape is a weighbridge. i'm still undecide about whether or not to go ahead with that idea because the shed would obscure the view of the signal box from "the ideal viewing position" Then the backscene needs to be finished. A grab shot lat last night included some odd shadows that have made me wonder about putting a suggestion hills onto the backscene rather than sky.
Unfortunately during the week someone stole my wallet with all my credit cards and the cash I'd earmarked for spending at the show, so that idea went out the window.
The good news is it meant I had a day at home on a Saturday when the wife was working and I wasn't, and that I decided to prioritse work on the layout.
I had a list of things I wanted to get done by the end of the day. Now anyone looking back through this blog will realise that I'm notoriously bad at keeping to my self imposed deadlines but for once I didn't do too badly.
It helped that on the Friday before work I finally fixed the point operating mechanism with a replacement DPDT switch - you don't need a DPDT for the electrics but generally they are larger than SPDT switches so provide sufficient mechanical throw to operate the point blades. A couple of quick remedial dabs with the soldering iron and I was back with a fully operational layout, meaning Staurday could be devoted to scenics.
I'd also used Friday evening to make a start on the replacement for the road bridge. The original version was built from card and scenic papers. I quite liked it but a decision to go for 3d corrugated textures on the goods shed and platform shed made me worry that the 2d look would be too obvious, so I swapped over to using Wills sheets. If anything these have more 3d texture than I would like.
Anyway by the end of Saturday the components of the new version were complete and painted, and I just need to assemble them. I'm not 100% happy with the colouring of either the stone or the brickwork but I think that just needs a bot of tinkering to sort out. Overall I think it is an imporvement.
![]() |
| Note that the various components of the bridge are yet to be joined and are just leaning against each other |
![]() |
| The Base Toys lorry converted to a flat bed |
![]() |
| The usual facilities |
This is the shed/urinal that was found, in some form or another, at the end of most platforms on the Tanat Valley. I'm afraid I miscalculated a few things when assembling this one so it is destined for the scrap bin, but building it was a useful exercise. This is the building which forced my hand to move to 3d sheets rather than printed paper because although there are some excellent corrugated iron textures available they wouldn't work for the free standing walls of the gents.
![]() |
| Minimum space modelling |
![]() |
| Moody |
Subscribe to:
Posts (Atom)